Shopify Integration
Basic Integration, Please visit this Video Link to have the needed steps to get your API from Bosta.
Here's written steps how to get your API key from Bosta Business Dashboard
Bosta App Installation on Shopify
- Install Bosta App from Shopify from this link Bosta plugin.
Connecting the App to your Bosta account
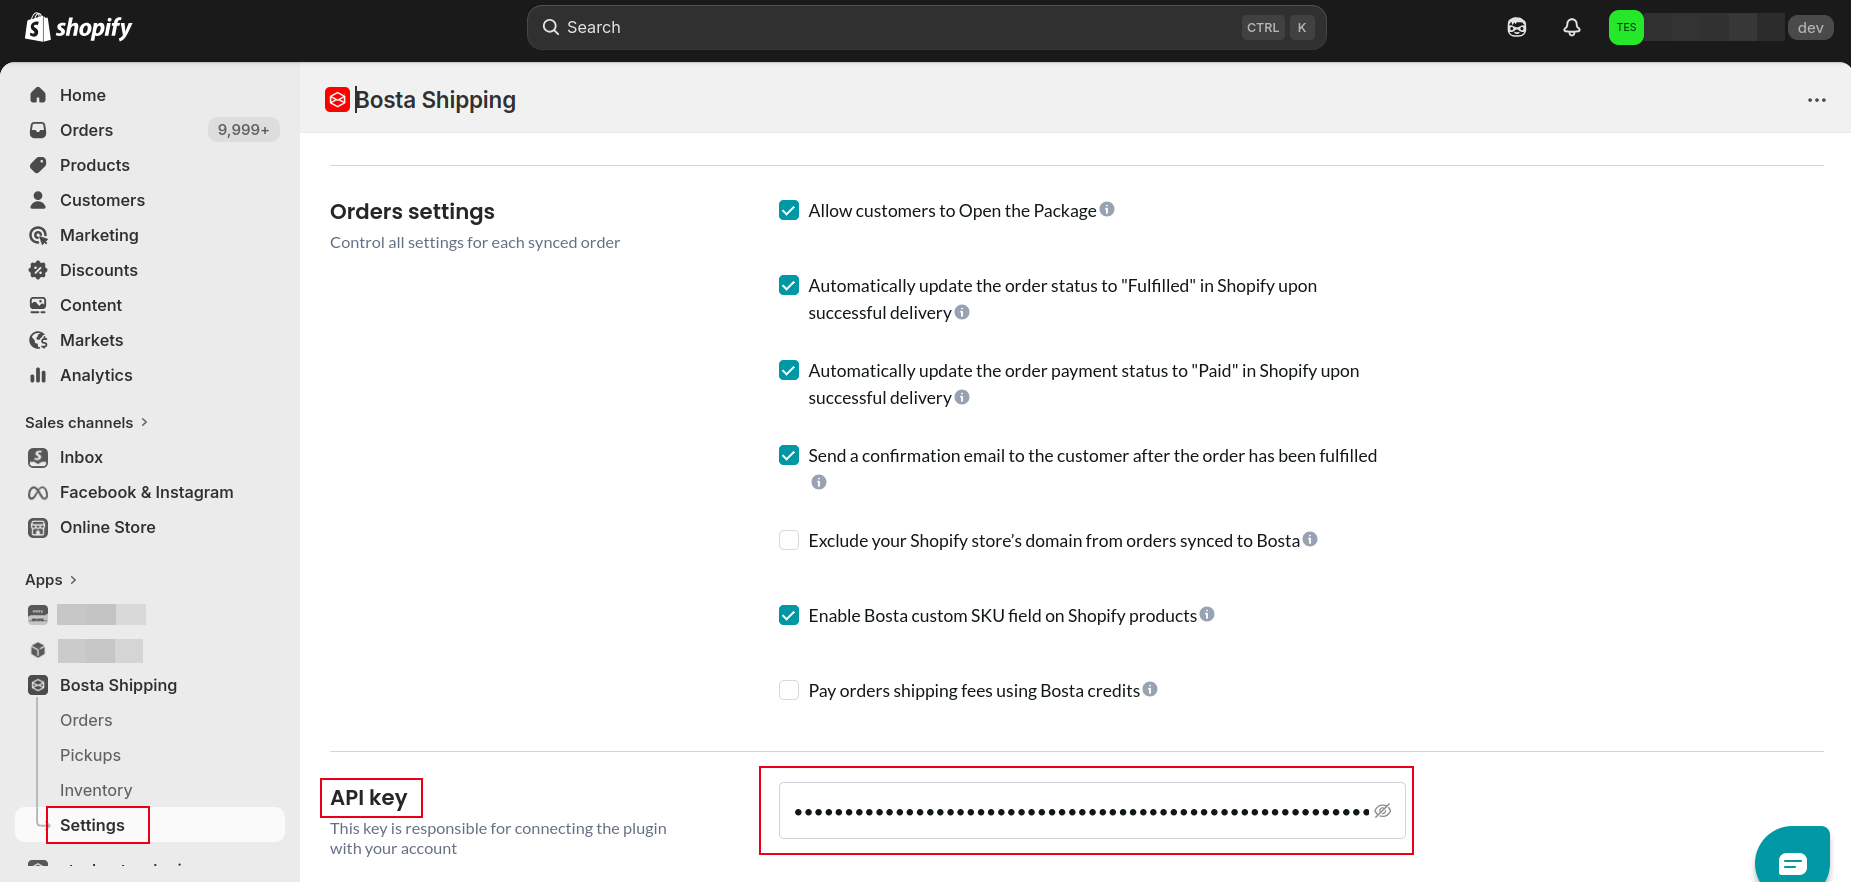
- Copy the API key you generated from your Bosta business dashboard.
- Add your API key then click the "Save Changes" button.
Bosta Settings Configurations:
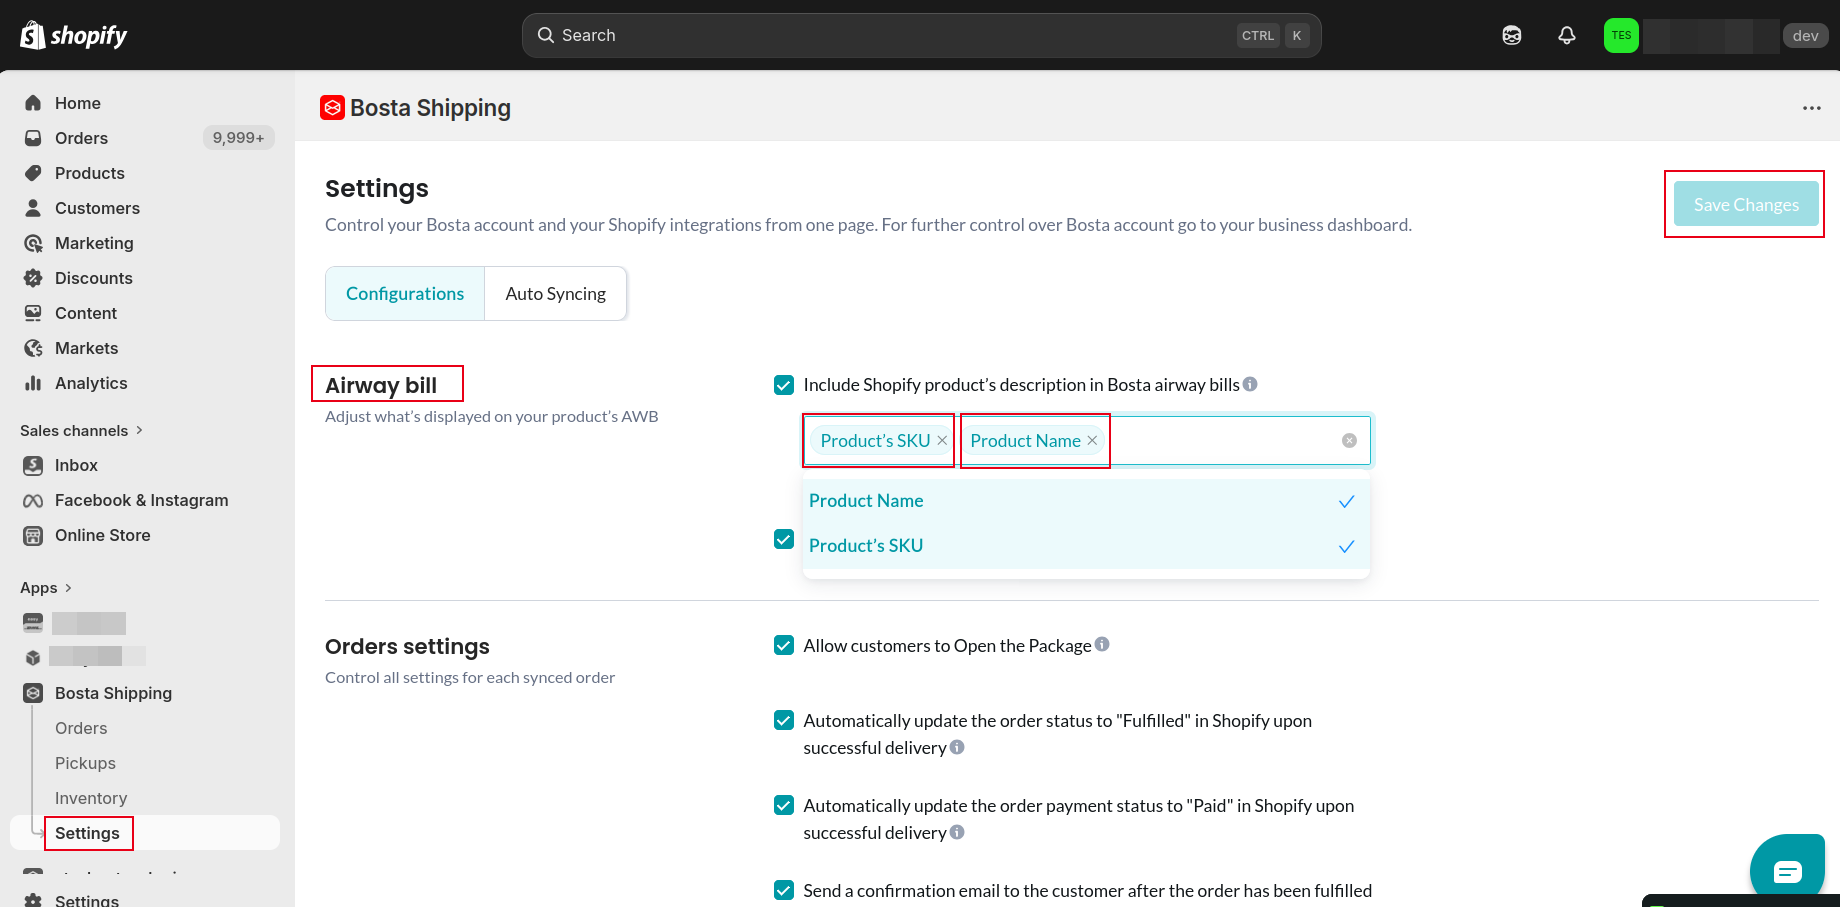
Bosta's AWB Settings
You can have multiple options for the AWB for your orders:
- Check the checkbox and choose the option you want to add(eg.: Product's SKU, Product's Name ).
- You can choose to include Shopify order notes in the AWB Note that it can't exceed 200 characters.
Bosta's Orders Settings:
Allow customers to Open the Package:
This enables your customers to open the shipments created on Shopify.
Automatically update the order status to "Fulfilled" in Shopify upon successful delivery Automatically update the order payment status to "Paid" in Shopify upon successful delivery
These mark your order as "Fulfilled" and "Paid" in Shopify's orders page upon successfully sending the order to Bosta.
Send a confirmation email to the customer after the order has been fulfilled
This enables Bosta to send a confirmation email to your customers upon sending the order to Bosta. The email has the Tracking number of the order at Bosta's system.
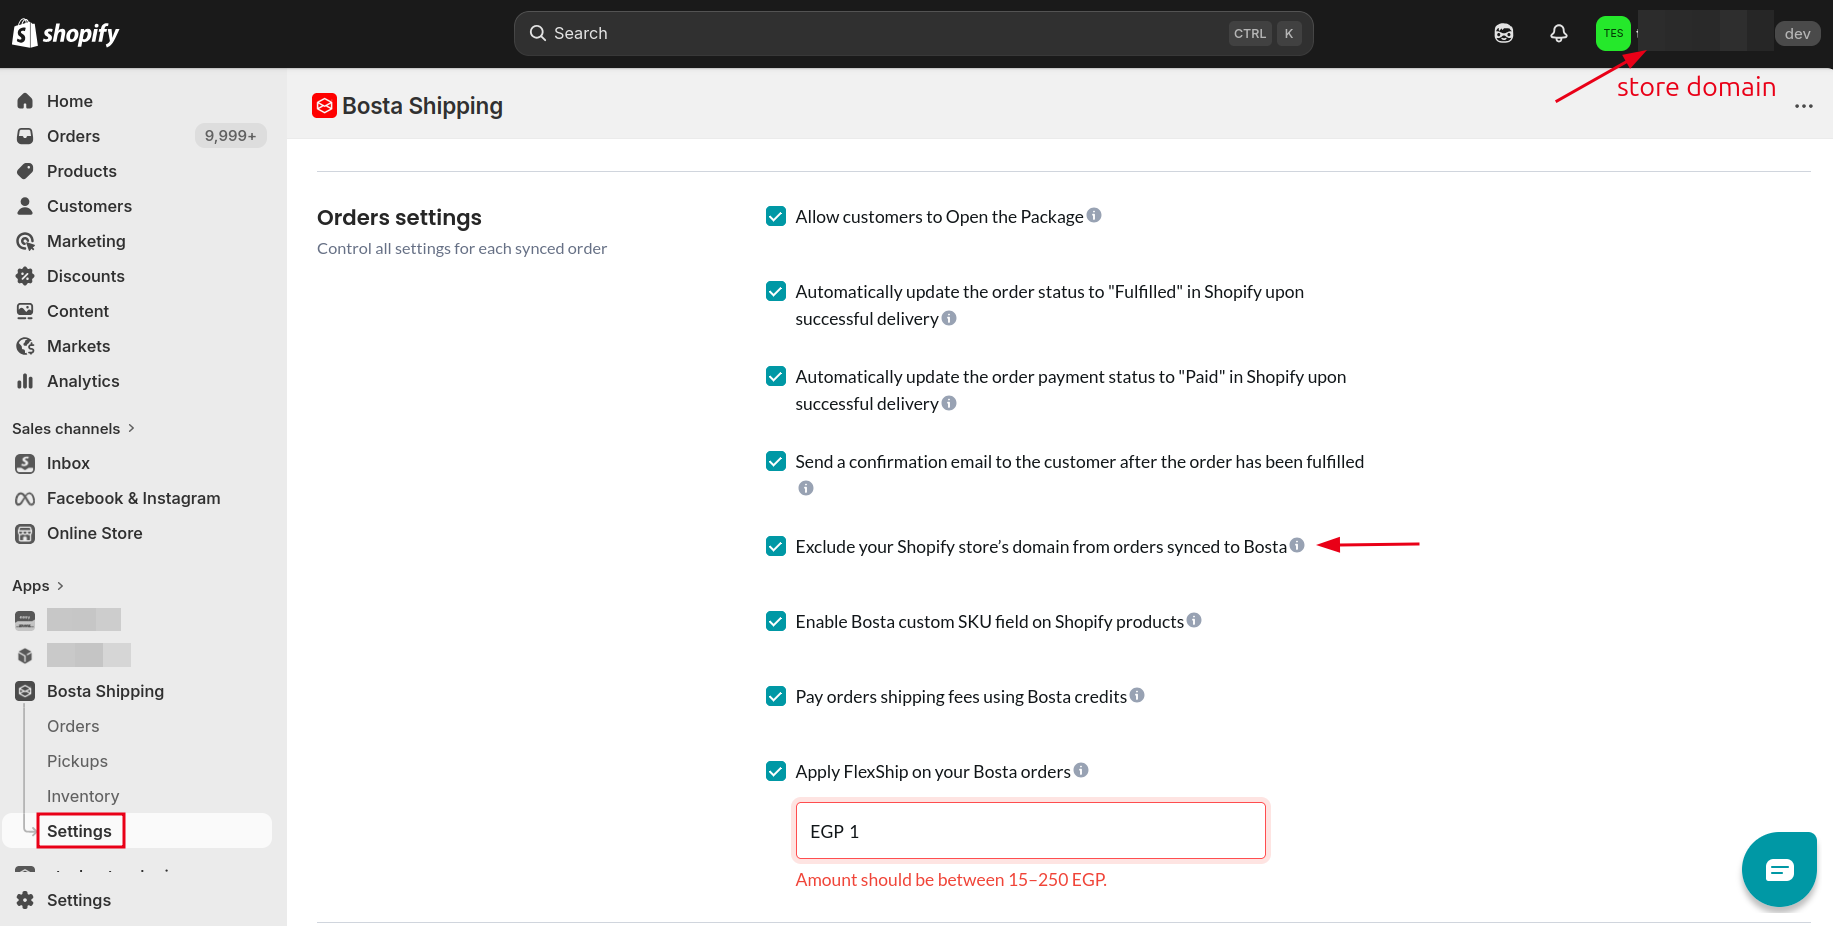
Exclude your Shopify store’s domain from orders synced to Bosta
This checkbox enables you to remove your store domain from the business reference of the order.
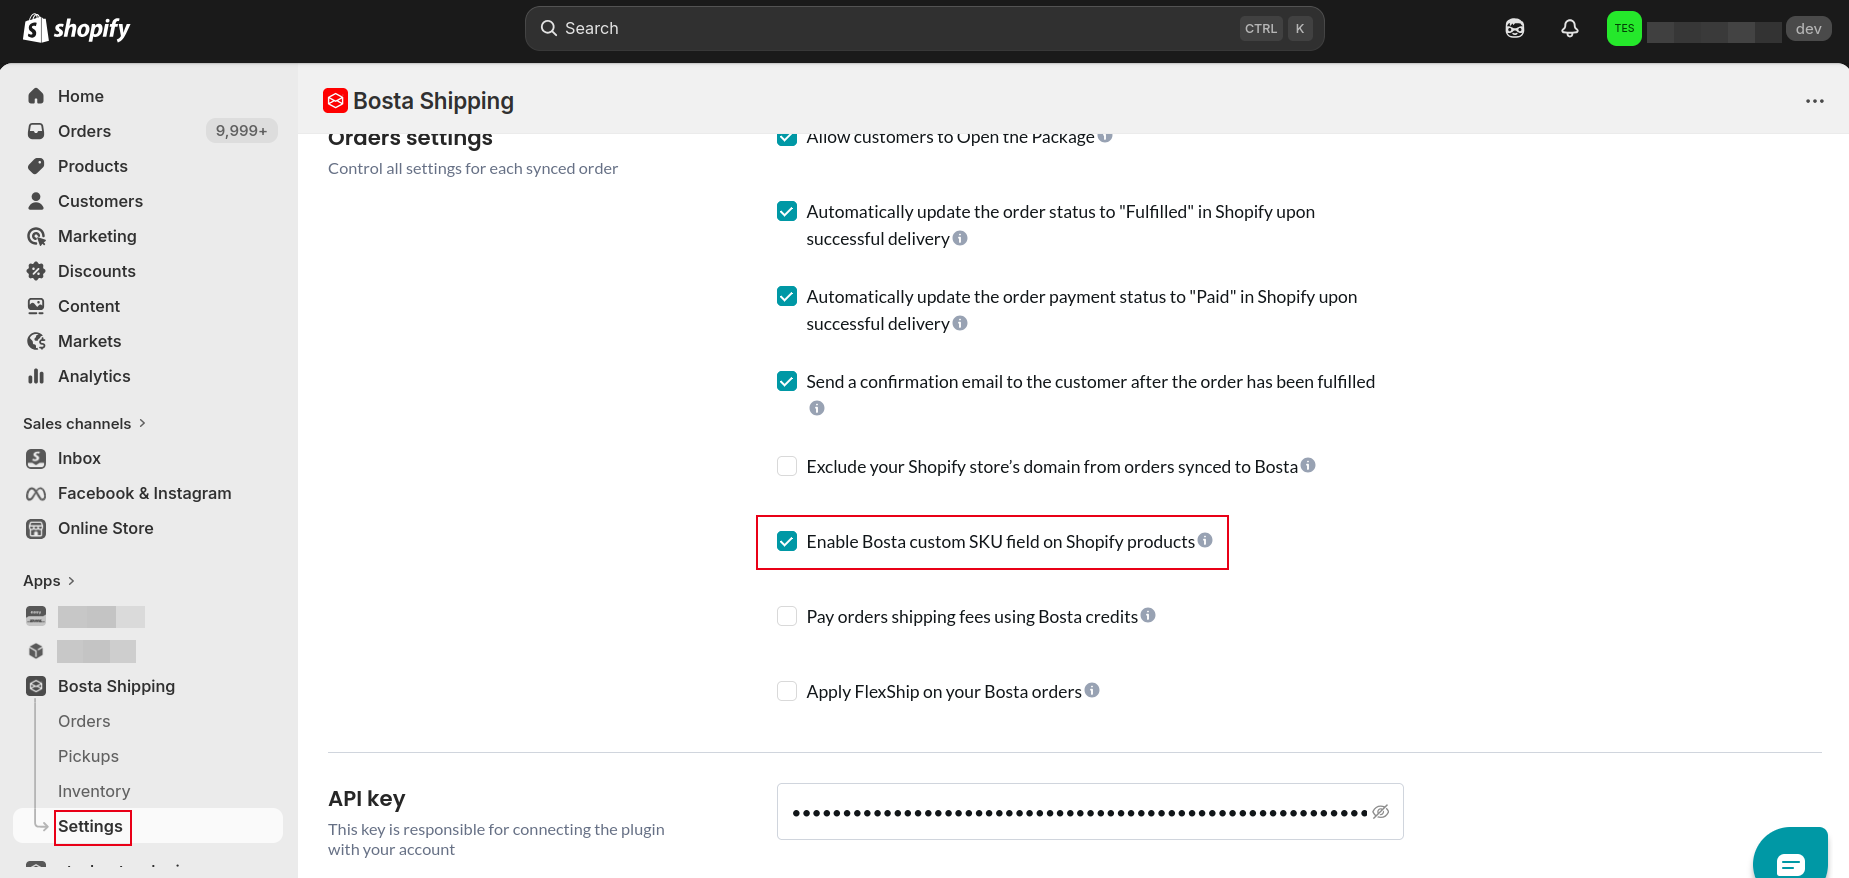
Enable Bosta custom SKU field on Shopify products
This checkbox is for businesses who use Bosta's fulfillment service. This enables the business to add their Bosta SKU on each product.
Pay orders shipping fees using Bosta credits This enables you to pay the orders shipping fees using your Bosta credits added on your Bosta business dashboard.
Apply FlexShip on your Bosta orders
This allows you to charge your customer a service fee in case of package refusal to reduce your refund costs.
Bosta's Auto Syncing orders
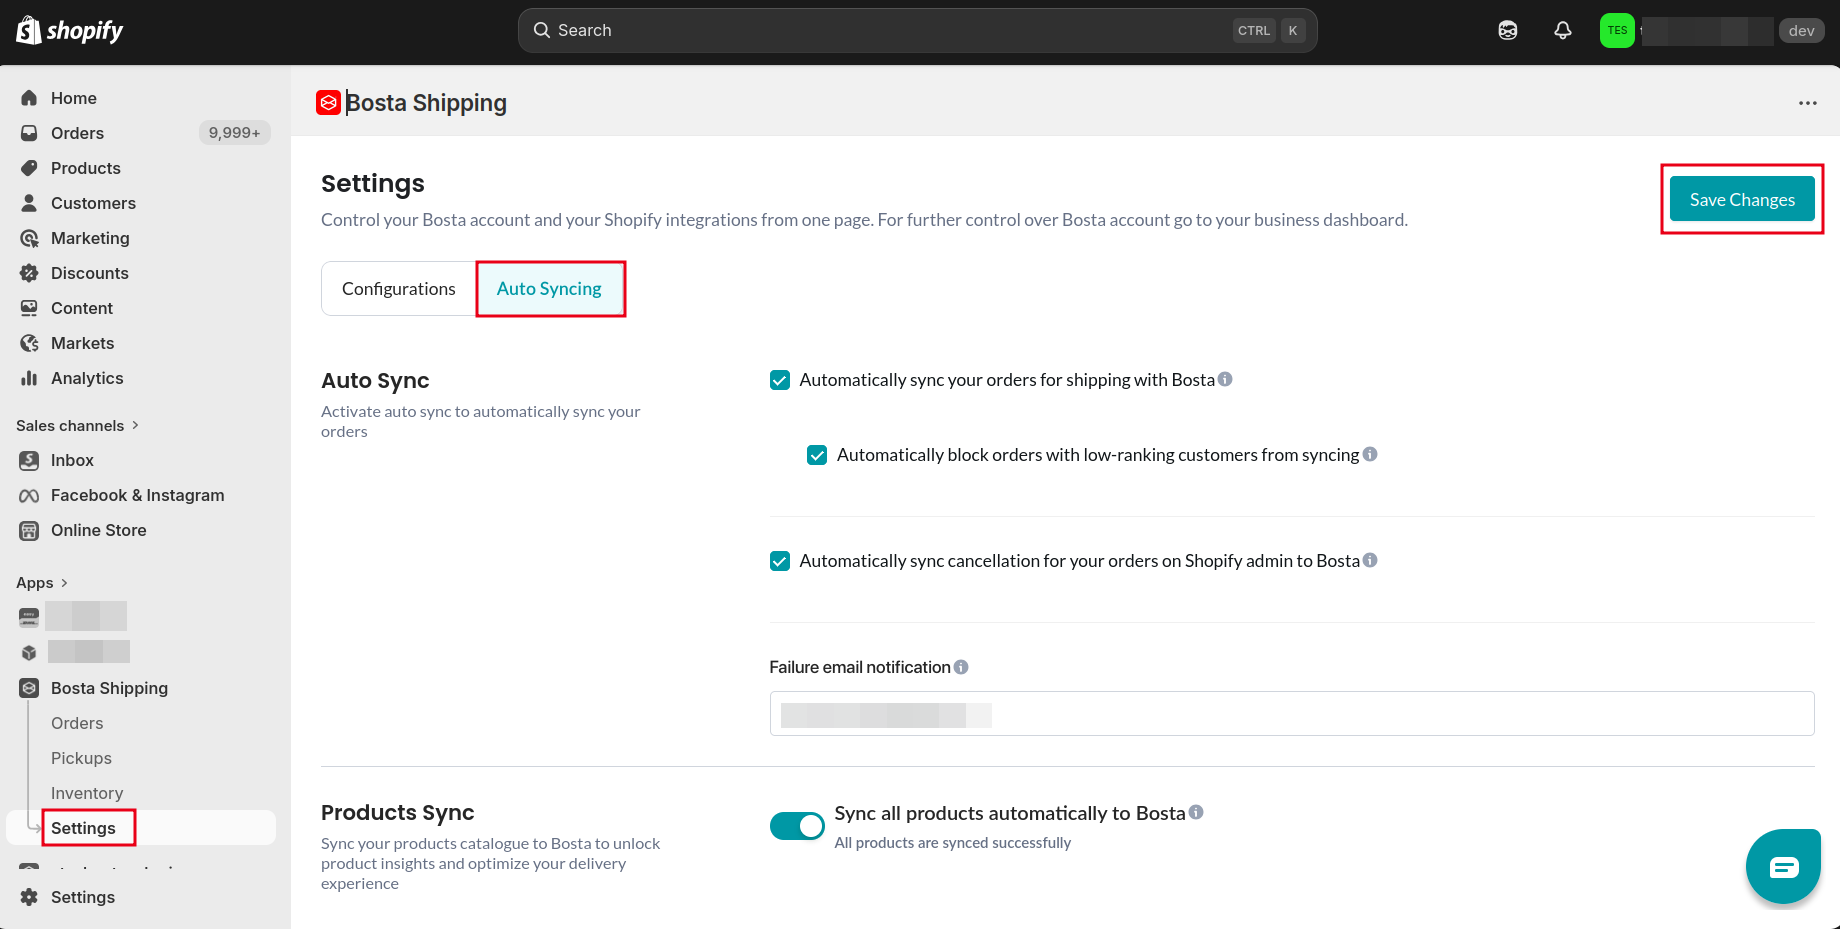
Automatically sync your orders for shipping with Bosta
This automatically sends all your new orders to Bosta.
Automatically block orders with low-ranking customers from syncing
Enable this to prevent orders from consignees with low delivery rates from syncing automatically. Note: These orders will need to be handled manually.
Automatically sync cancellation for your orders on Shopify admin to Bosta
Automatically Sync Cancellation for Your Orders on Shopify Admin to Bosta.
Failure email notification
This allows you to add an email address to be notified of any order synchronization problems.
Sync all products automatically to Bosta
Sync your Shopify Products directly to Bosta to manage shipping orders more easily.
Your products catalogue will be automatically updated in Bosta.
After installation you will notice the Bosta plugin is installed and activated! 🎉
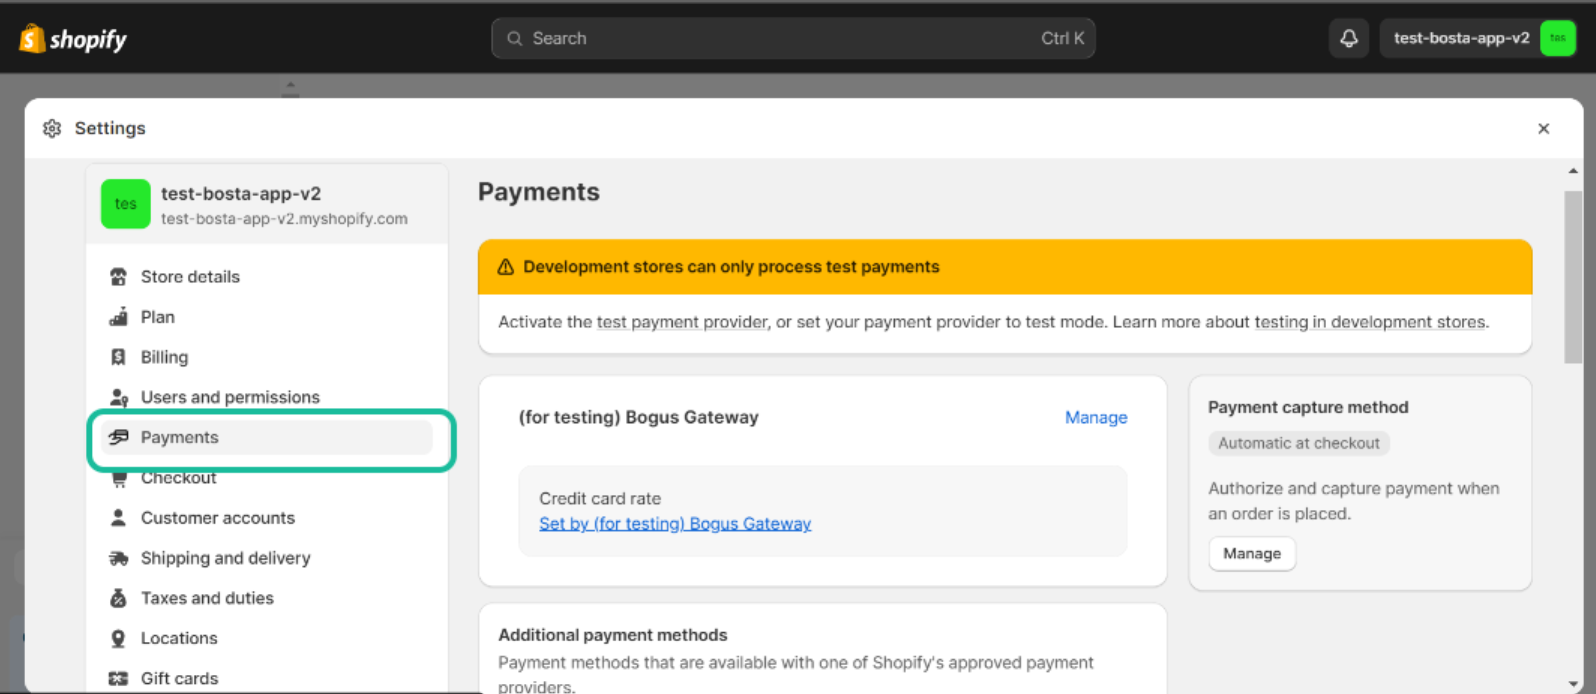
Payments
- Payment methods:
- Please Go to Shopify settings you'll find payments in the sidebar
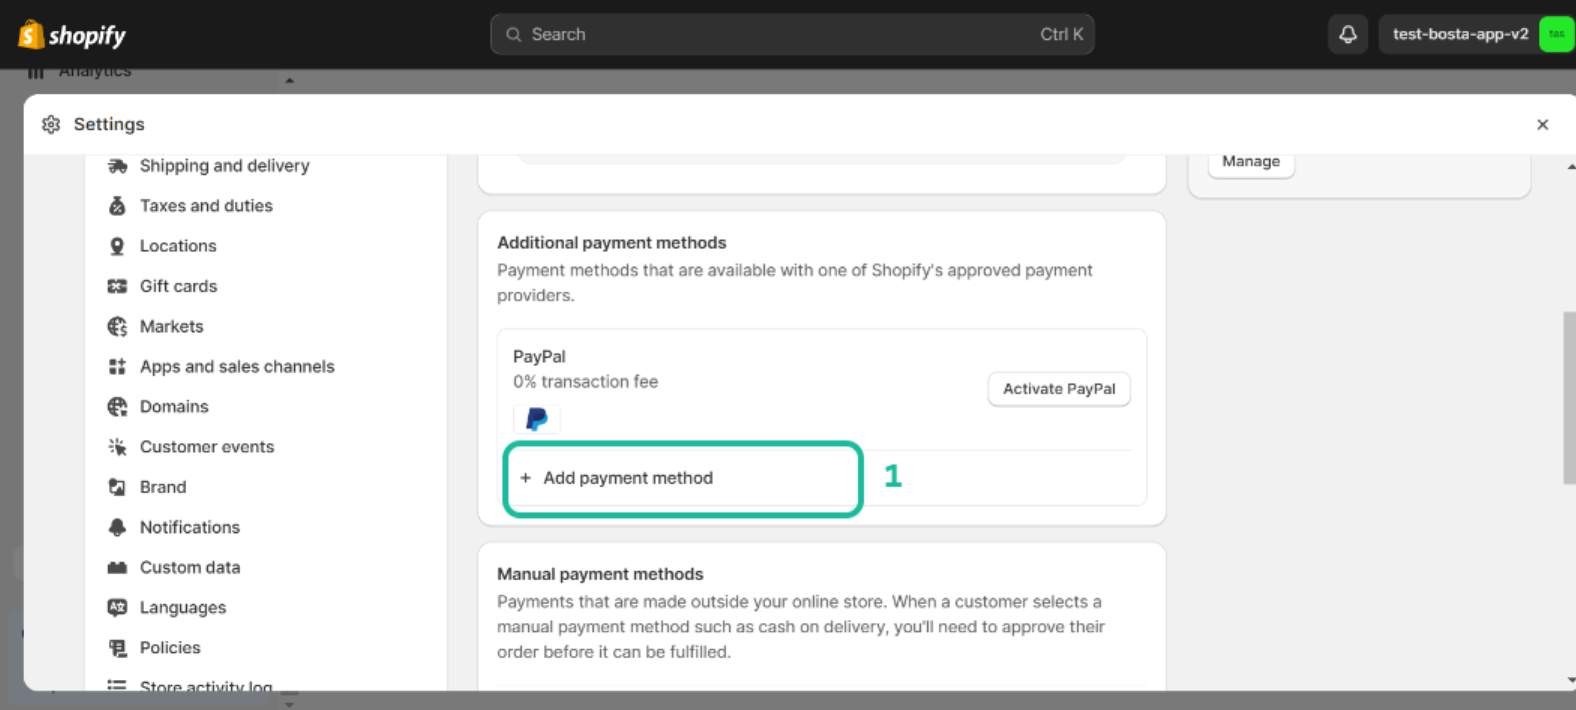
- You will need to add a payment method
- Click on Add payment method
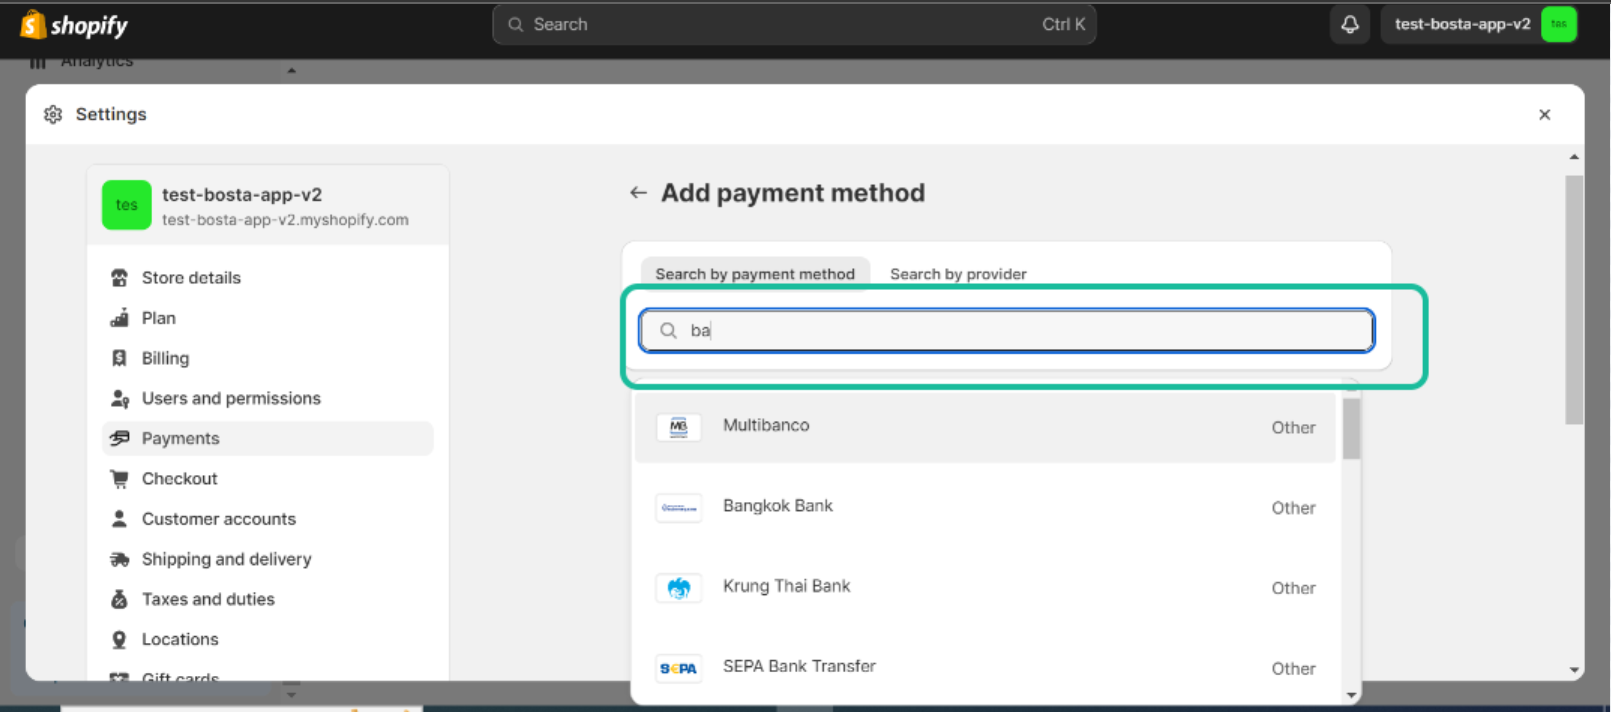
- Now you can search for a method that fits you
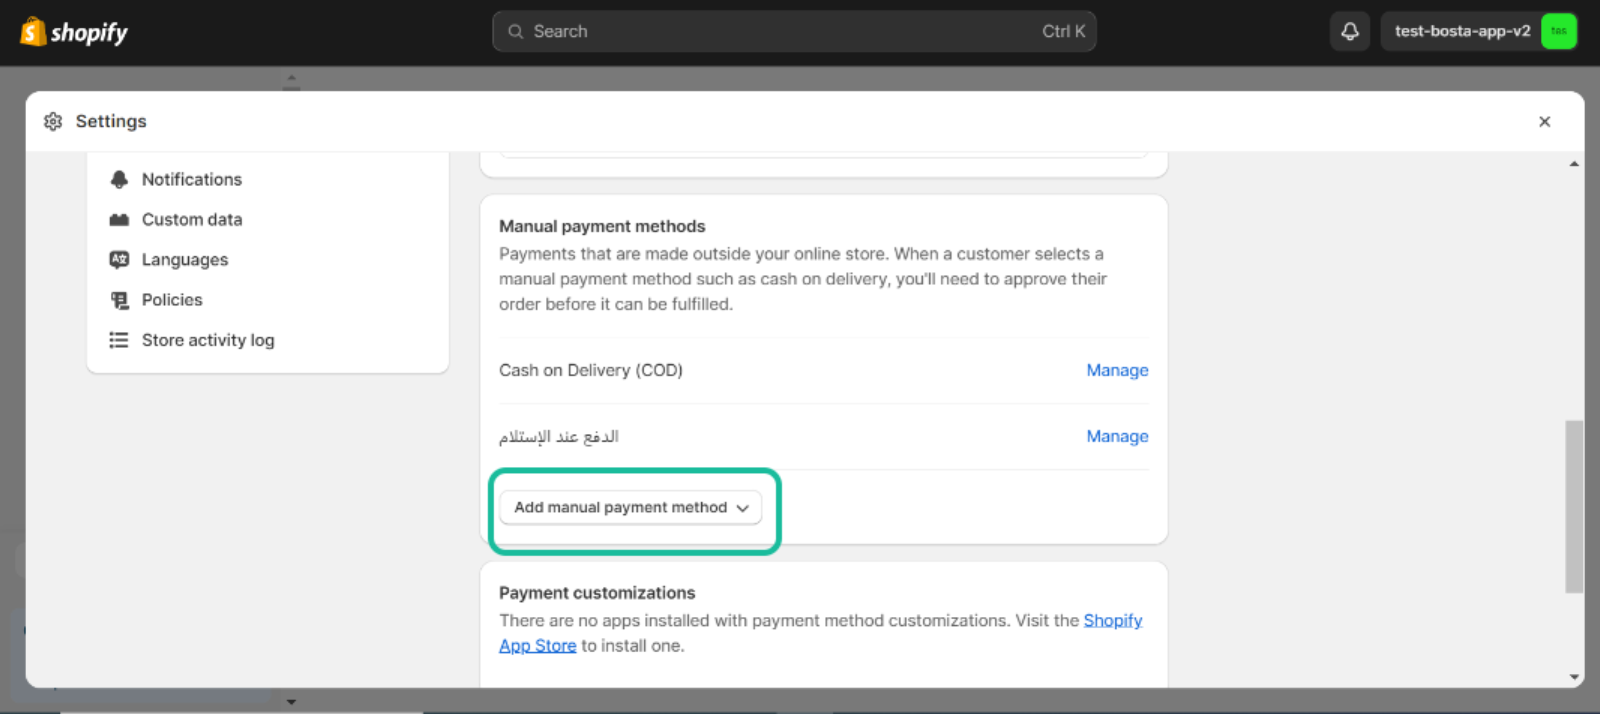
You can also create your custom payment method as shown here ⤵
Note: If you choose to have payment collected as cash on delivery (COD), your manual payment methods should contain one or more of the below payment methods, and the name of any of them should match explicitly the below and that any other payment method will be treated as 0 COD (cash on delivery) order
- Cash on Delivery (COD)
- الدفع عند الأستلام
- الدفع عند الإستلام
Sending Orders
Syncing Regular Orders
- Sending orders
- Before starting sending the orders we should check in Shopify orders about fulfillment status.
- Important: The order must be Unfulfilled before being sent to Bosta
- You should check the fulfillment status column
- if it is unfulfilled it is ok.
- if it is fulfilled then you have to mark it as unfulfilled.
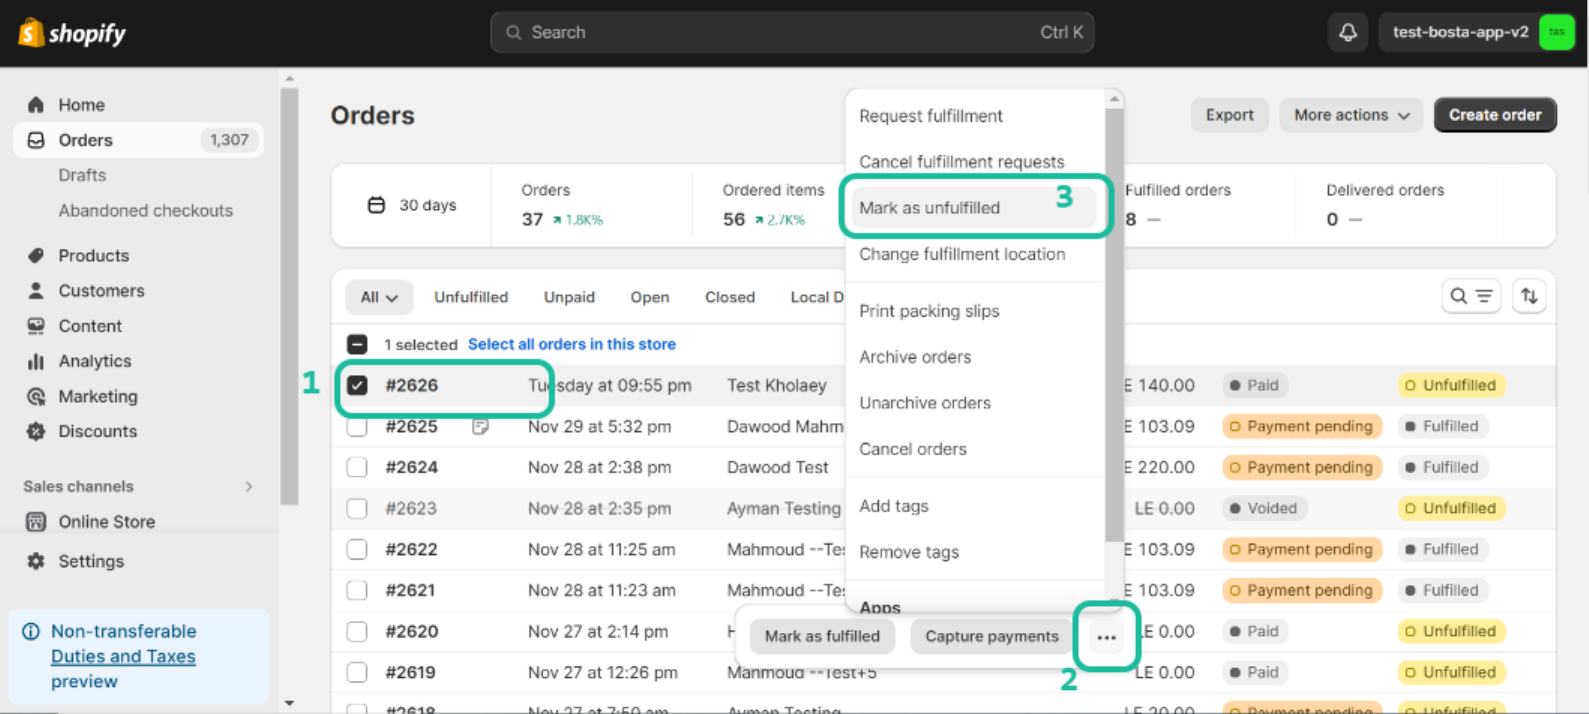
- To make sure it is unfulfilled you can click on the order you want to send then you will find three points press to see the option for 'Mark as unfulfilled'
- Click on the 'Mark as unfulfilled' button.
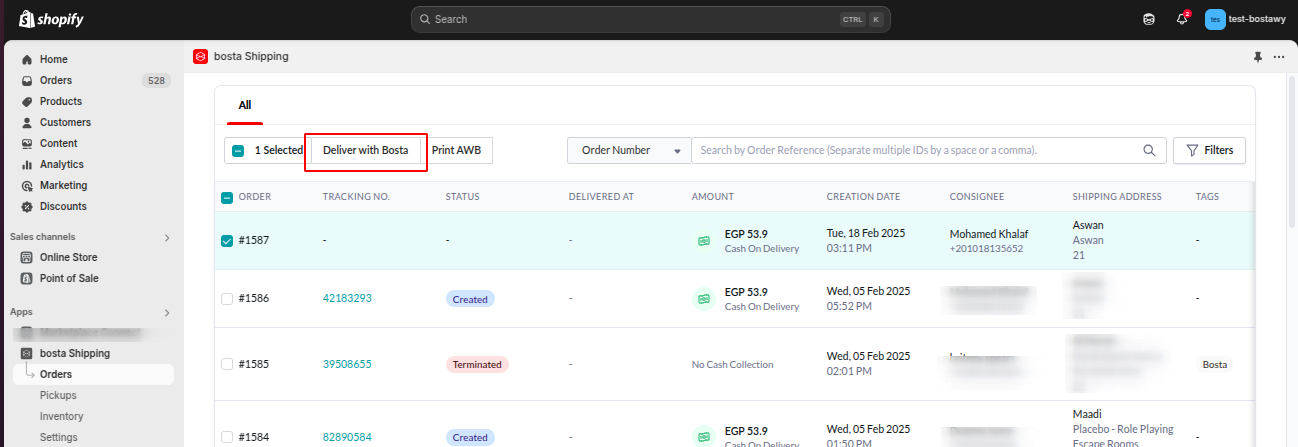
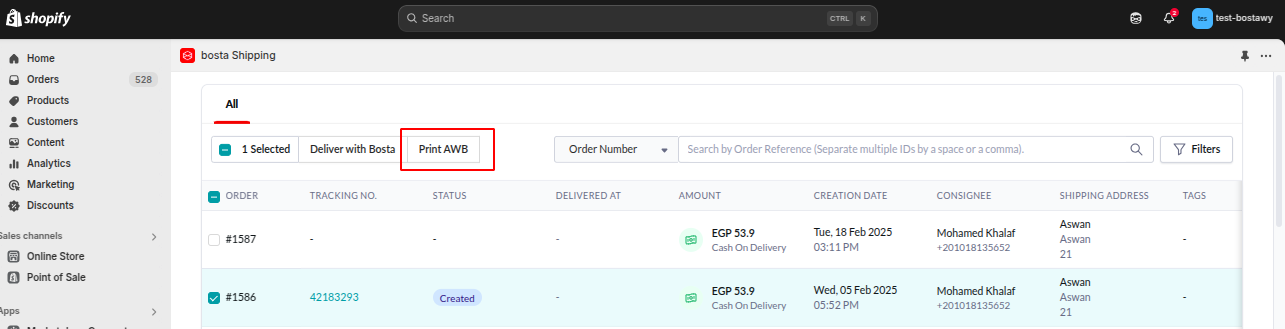
- To send an order to Bosta you need to go to the sidebar -> Apps -> bosta shipping -> Orders
- Please select the orders you want to send
- Click on the 'Deliver with Bosta' button.
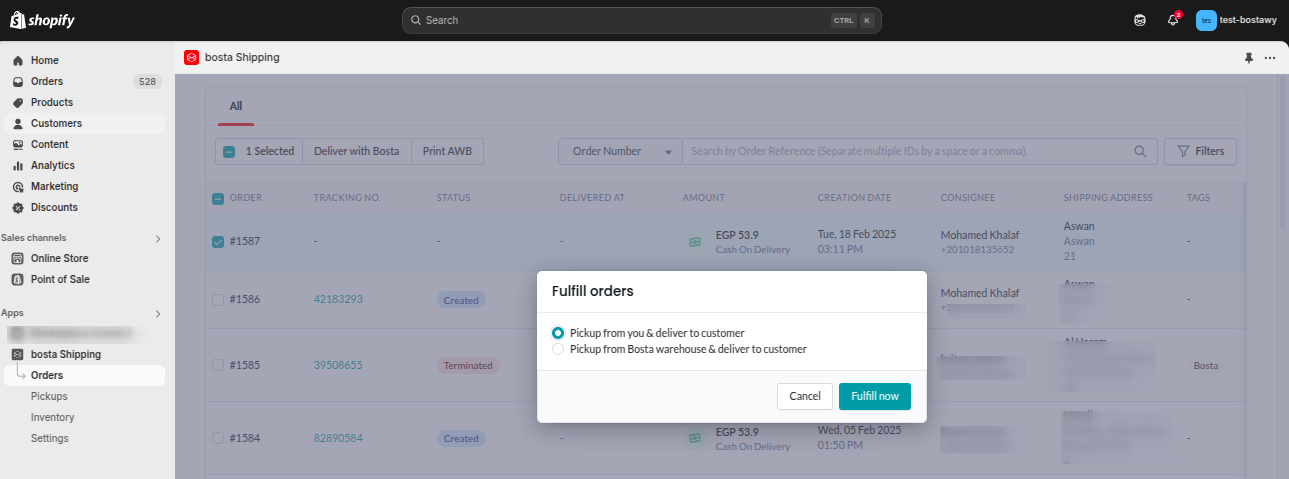
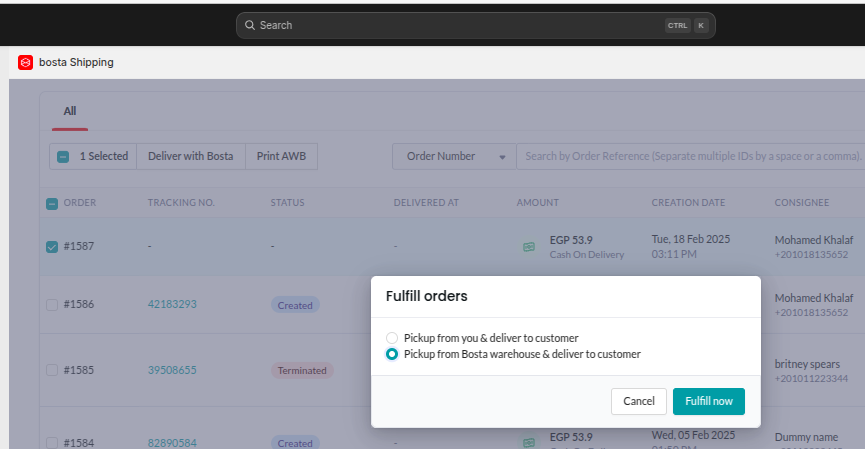
- After that, you would see a screen with two options
- The default option 'Pickup from you and deliver to customer'
- If you are not storing your products with Bosta using fulfillment service use it as the default
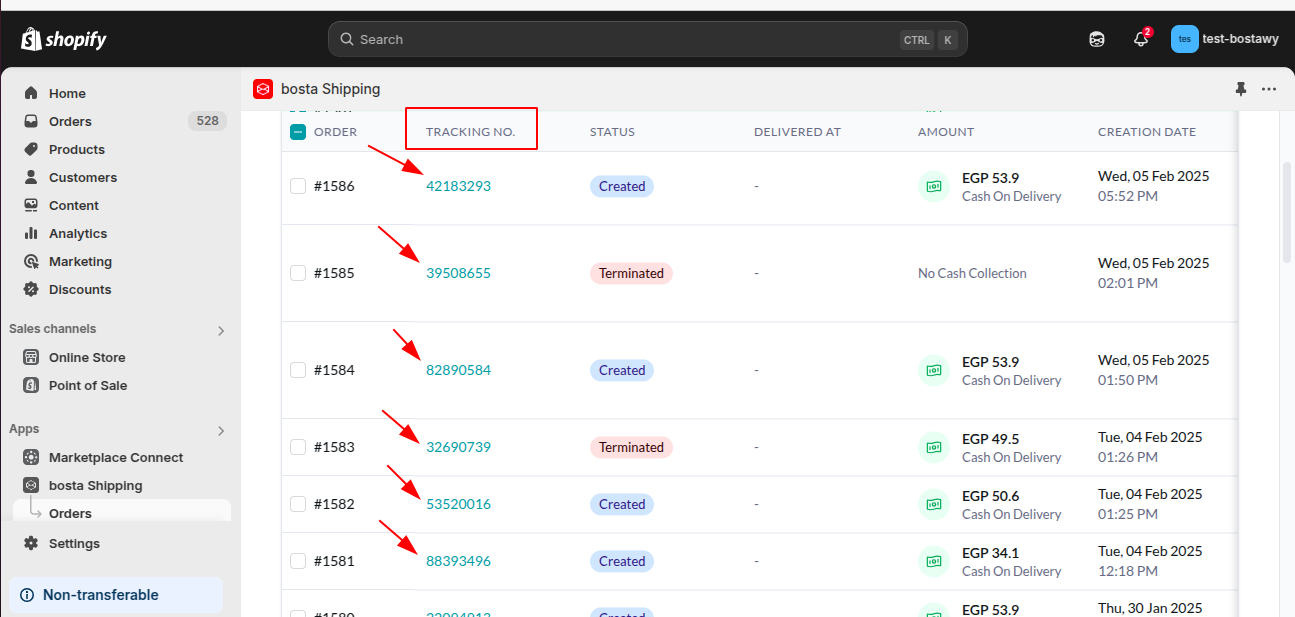
- After sending you will see Tracking order details here ⤵
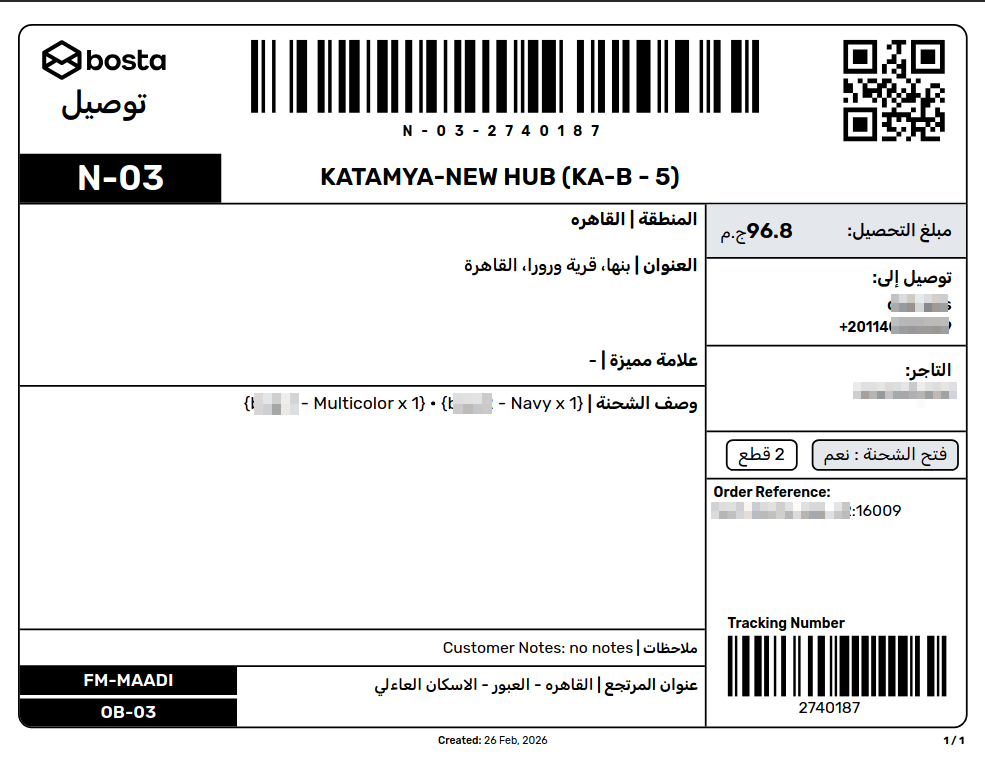
- If you want to see Printing AirwayBills for your orders
- You can select the orders you want to print the AWB for it
- It will be downloaded on your mobile/laptop.
- The AirwayBill should be something like this ⤵🧾
Syncing Fulfillment Orders
How to connect Shopify products with Bosta fulfillment products?
- Open your products section in the sidebar > products
- You will need to open the product itself
- So click on the product.
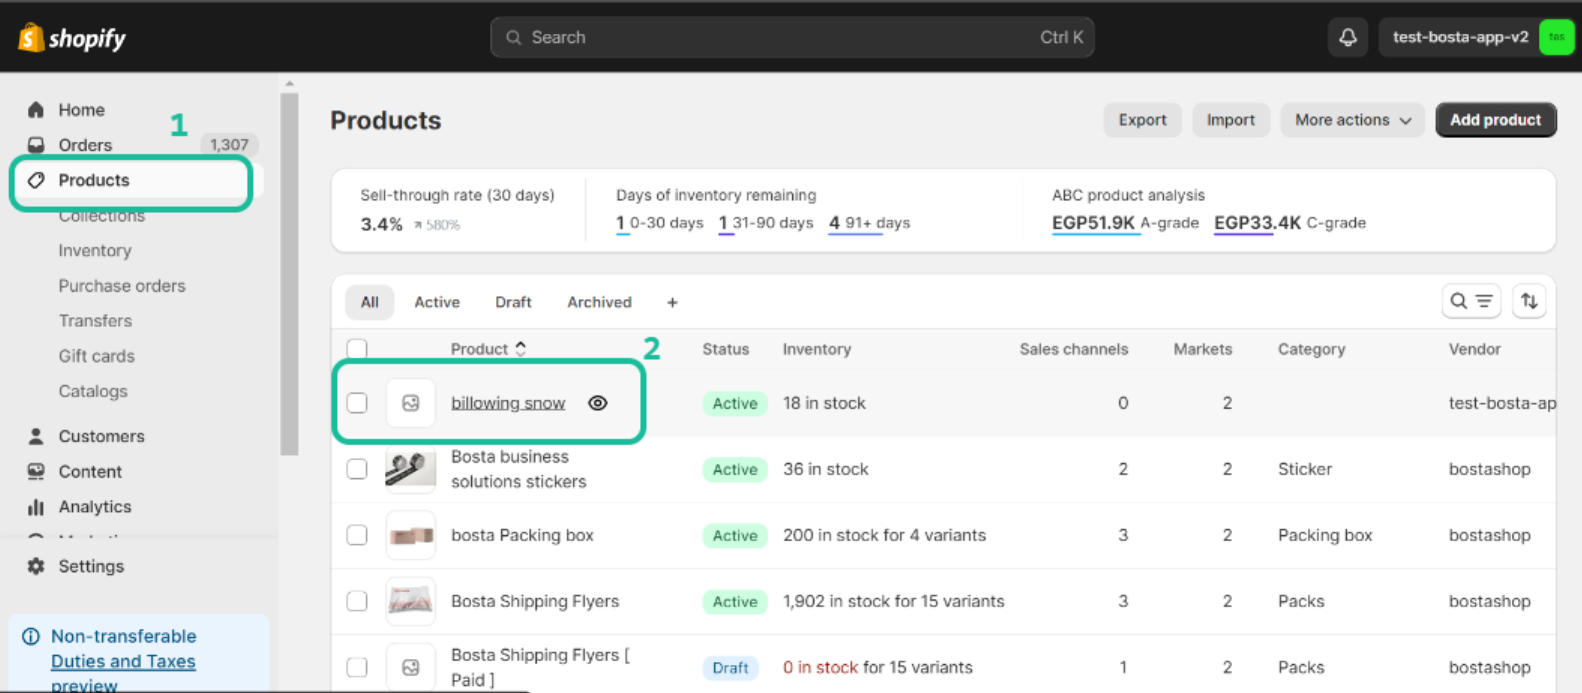
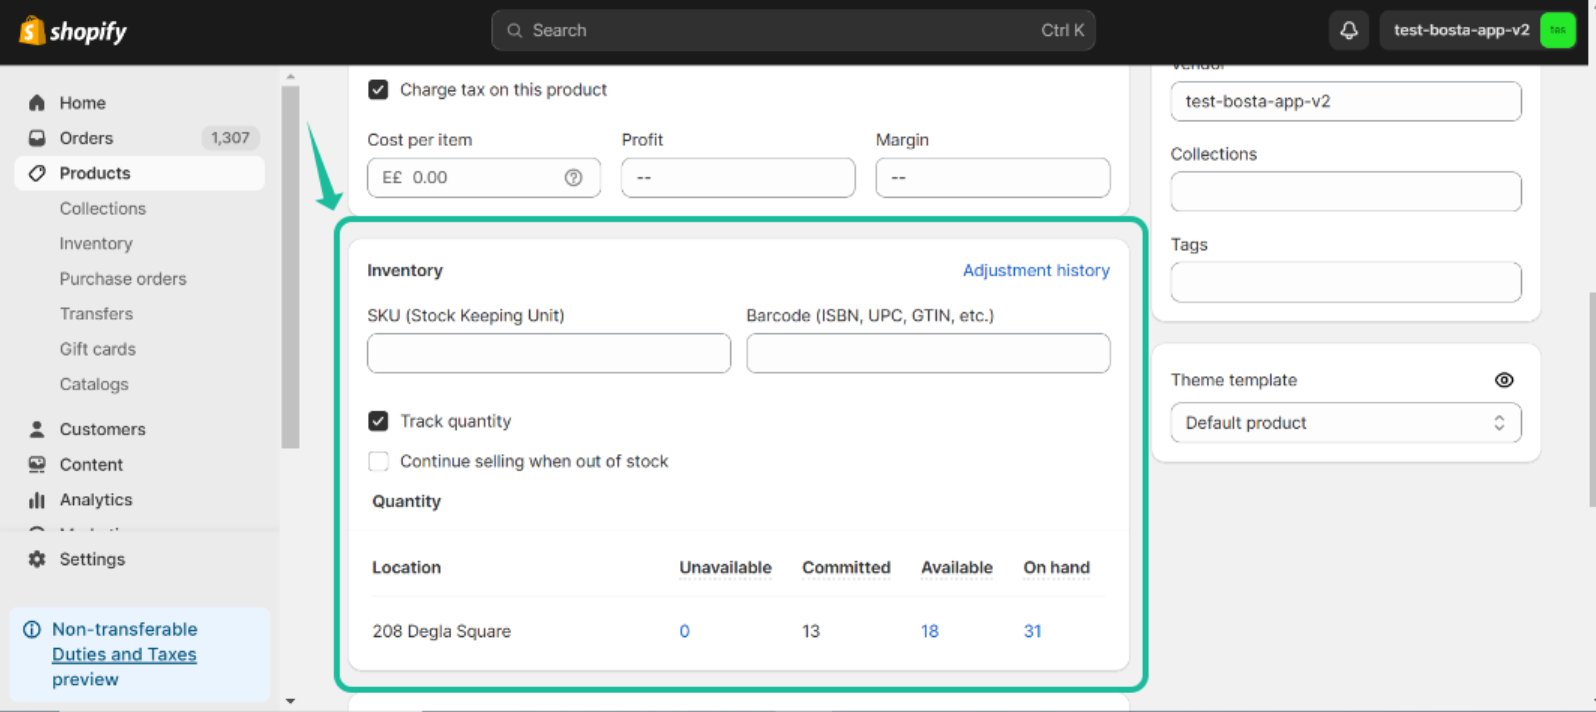
- In the product you need to add inventory information like Bosta's SKU (Stock keeping unit), Barcode, etc..
- After filling in your inventory information click on the save changes button
- Notes:
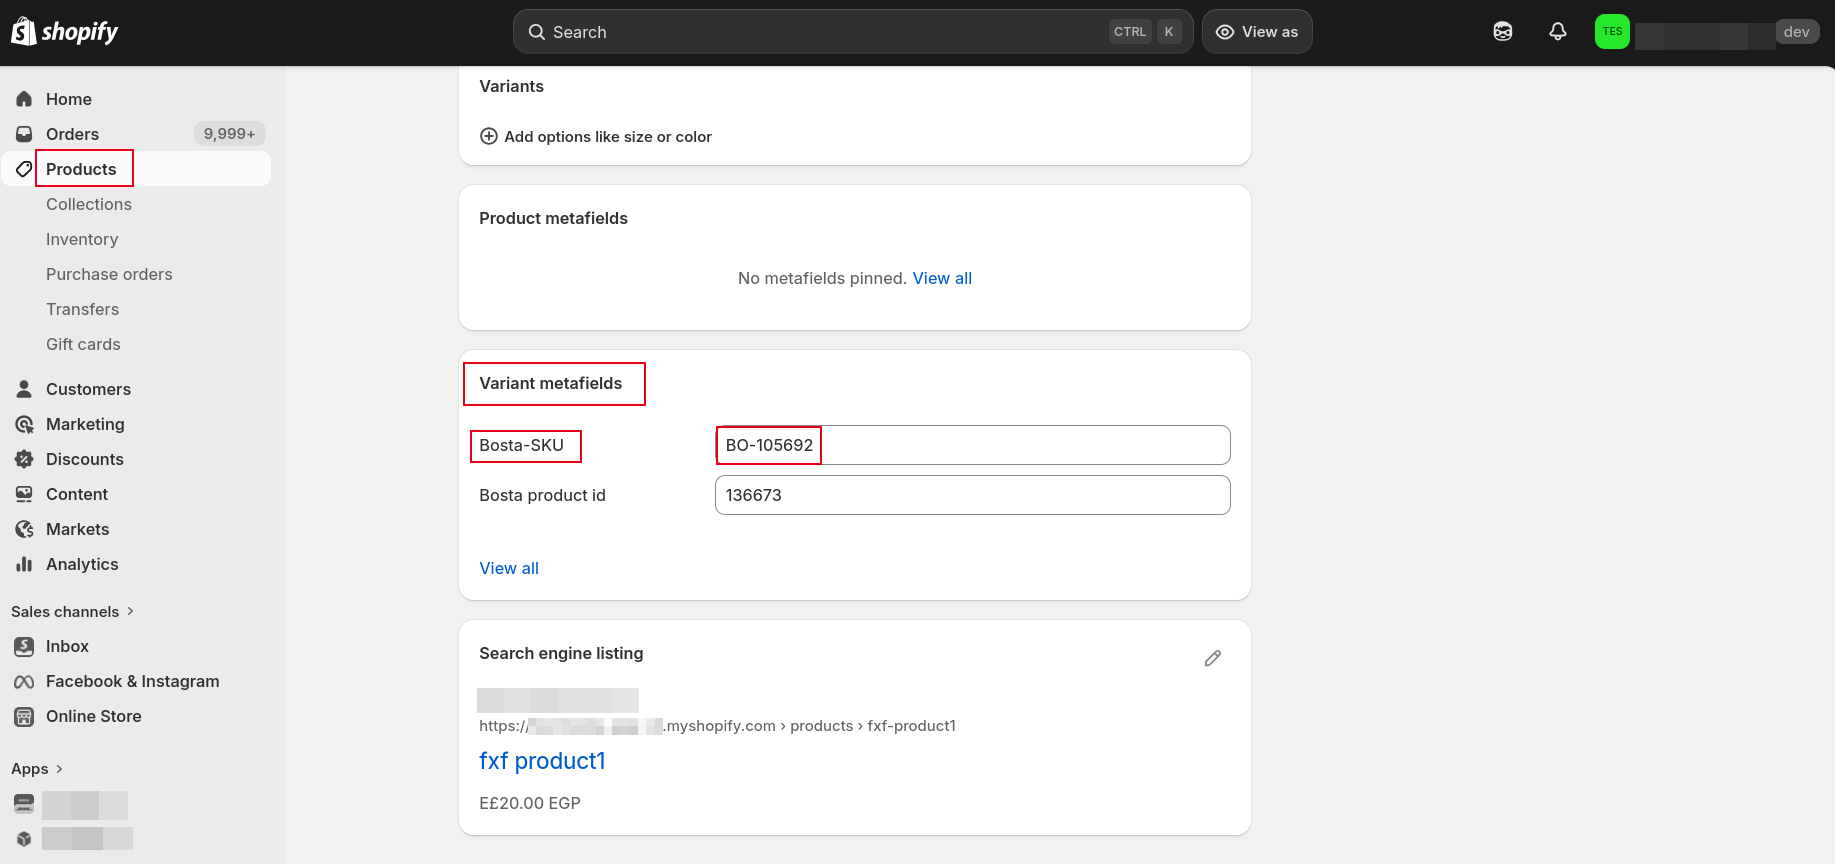
If you have an internal SKU system and want to add it to your products alongside Bosta's SKU
 Now you can add the your internal SKU in Shopify's SKU field in the products page.
Then add Bosta's SKU below in the Variant metafields section.
Now you can add the your internal SKU in Shopify's SKU field in the products page.
Then add Bosta's SKU below in the Variant metafields section.
While sending the orders you need to choose the second option that you have a warehouse at Bosta and you want to pick up from Bosta and deliver to the customer
Managing Orders:
Edit orders
- Select the order you want to edit .
- To see the edit option button you should scroll horizontally to find the actions.
- Click on the three dots icon.
- Click on edit.
- A form will open to let you edit the order details
- Click on save once you finish
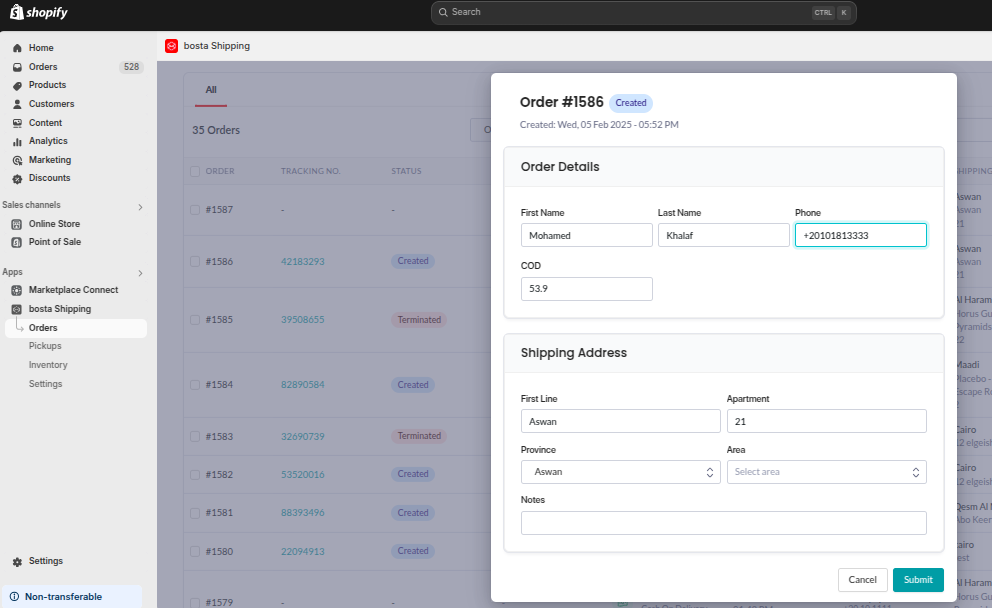 Note: You can edit the COD amount in the order only after the order is synced to Bosta.
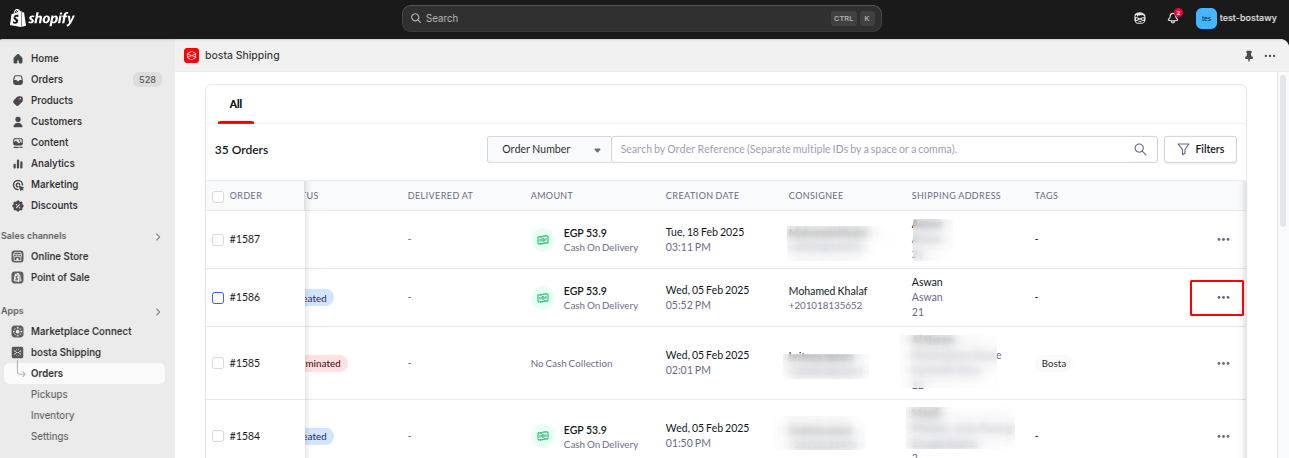
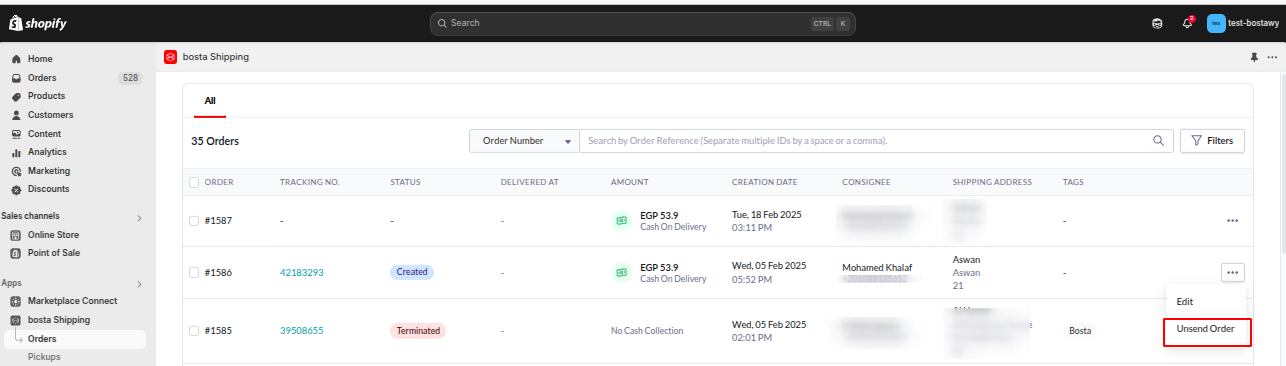
Unsend orders
- select the order you want to unsend.
- To see the unsend option button you should scroll horizontally to find the actions.
- Click on the three dots icon.
- Then click on `Unsend Order`.
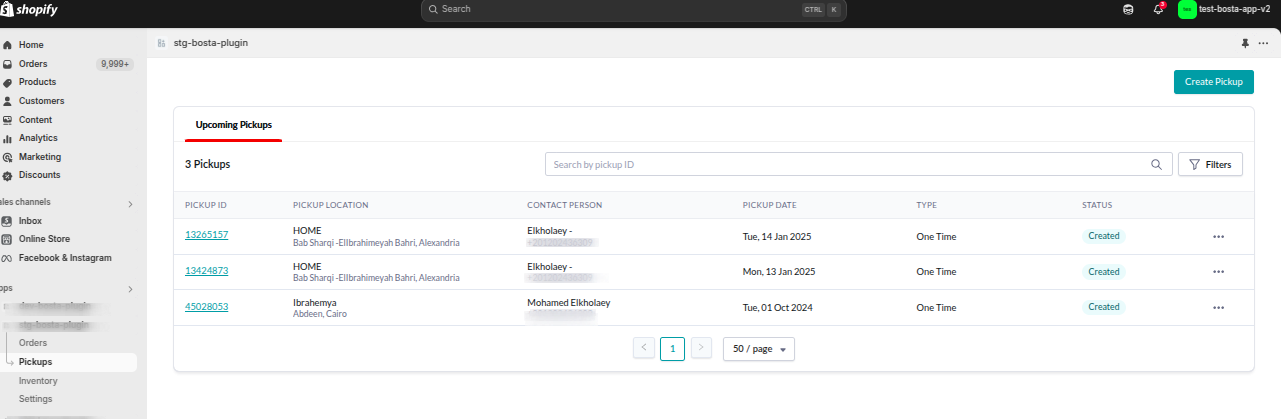
Create Pickups and show pickup requests
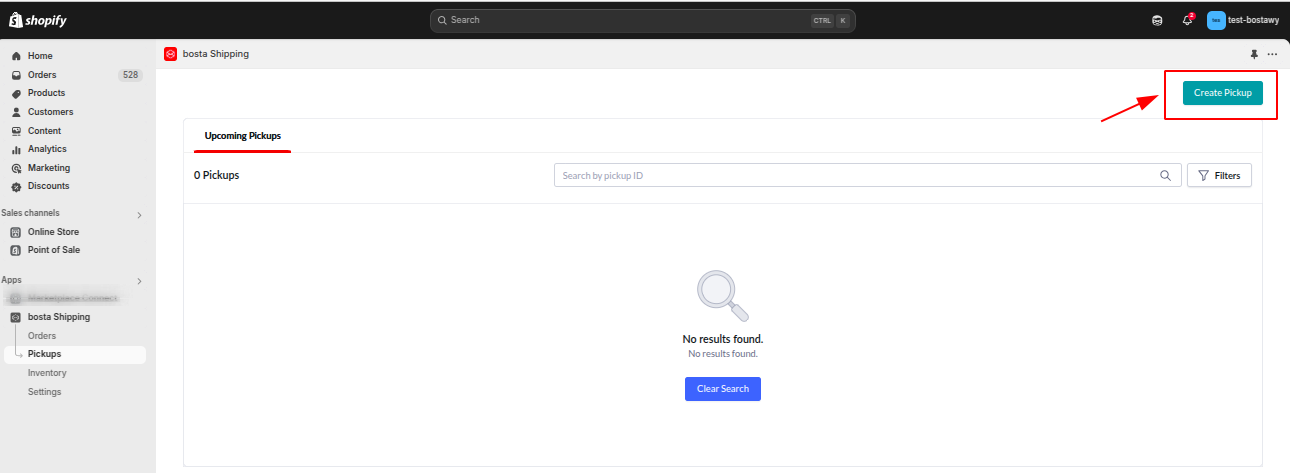
How to check on your pickups?
- First, You need to go to the sidebar -> Apps -> Bosta Shipping -> Pickups
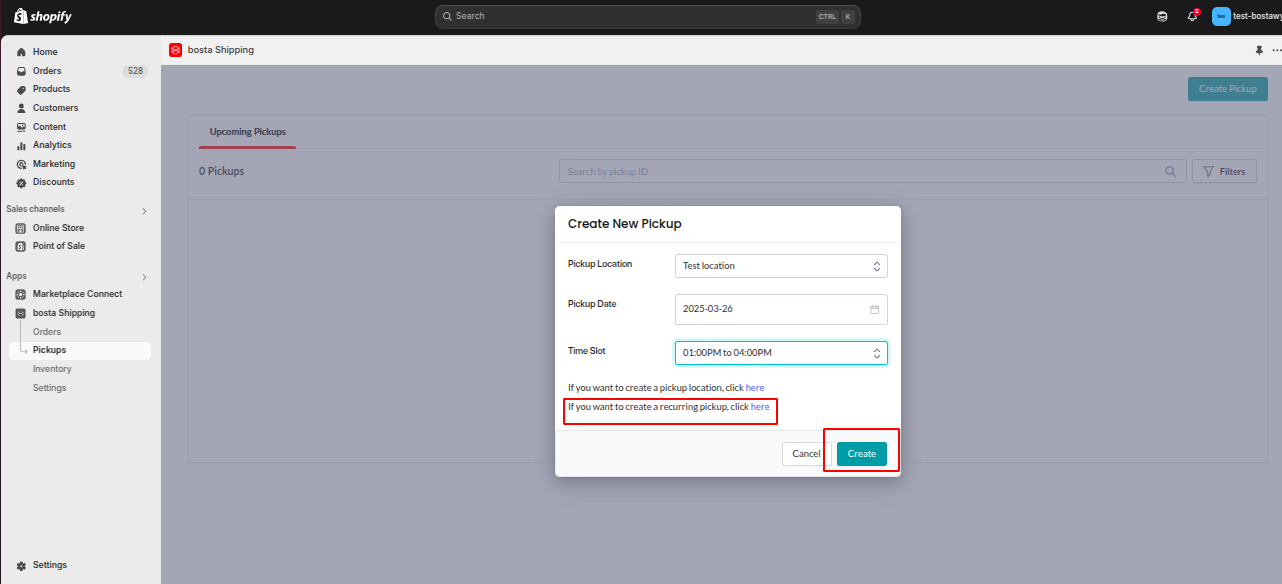
- To create your pickup you will find a button to create a pickup request as shown here ⤵
- A form will open to fill in your pickup information
- After finishing just click on Create and your pickup will be created.
- You can have an instant pickup time so you can just create it once and it will pick up your orders everytime with the same information you entered. So you can press on Create a recurring pickup.
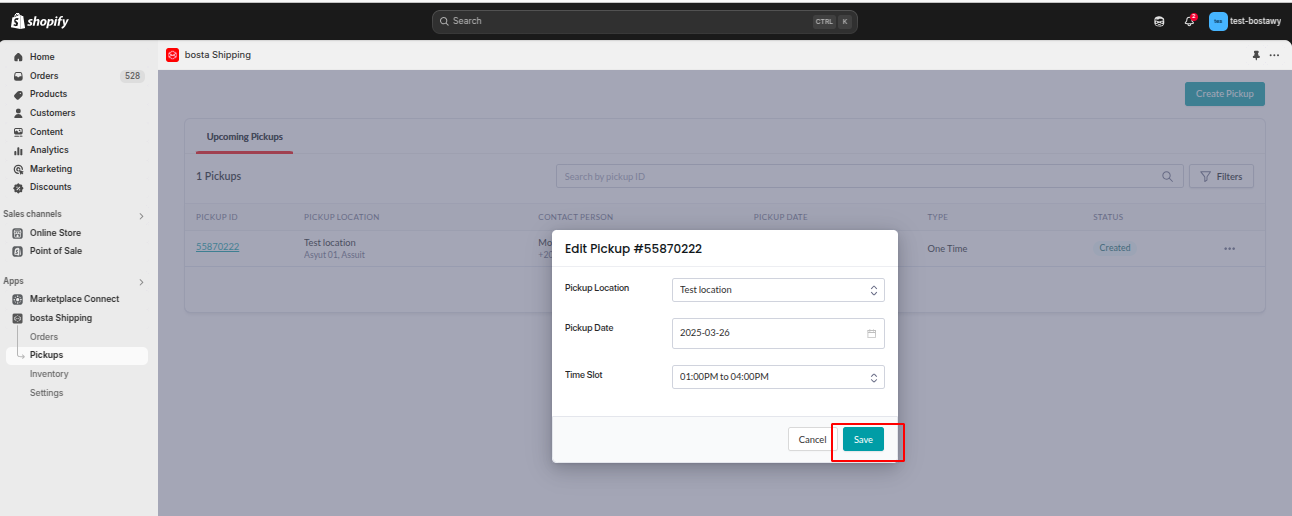
- You can edit your pickup information if you want
- You can select the pickup you want to edit
- Click on the three dots icon
- Click on the edit button
- An editing form will open
- Save changes after updating
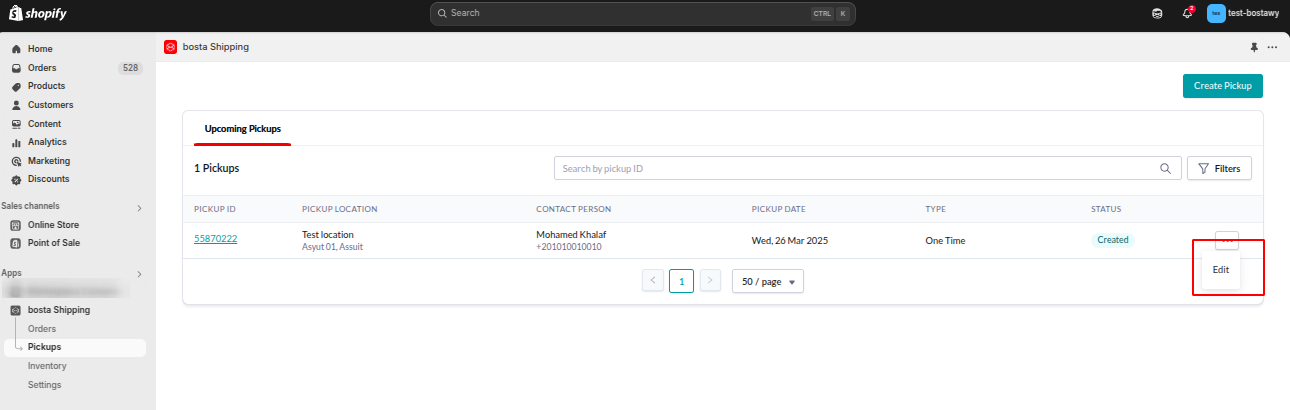
On Shopify , only your upcoming pickups are displayed
- Upcoming Pickups
Sync your Shopify stock with Bosta fulfillment stock
Overview
The Sync Stock feature is designed for businesses using our fulfillment service through Bosta. This feature automatically synchronizes your Shopify inventory with Bosta's stock. Whenever you create a purchase order (PO), return to vendor (RTV), or delete an item in Bosta, you no longer need to manually update these quantities in Shopify. Below are detailed instructions on how to utilize this feature, complete with screenshots.
1- Ensure you have added your valid Bosta API key to the plugin
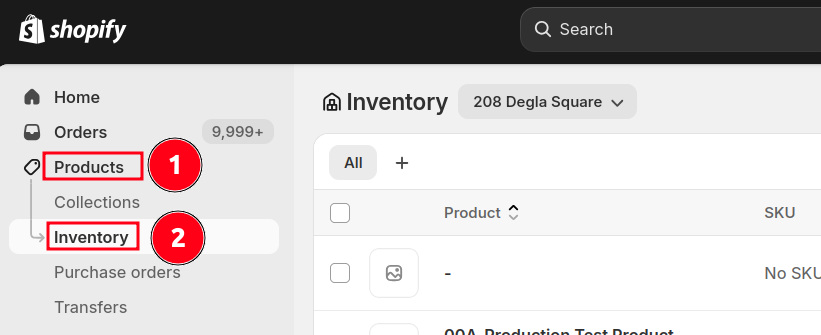
2- Confirm Inventory Location
To sync your Shopify's inventory stock with Bosta's stock, Click Confirm to allow Bosta to update quantities in your Shopify store's default location stated in the inventory page as shown below.
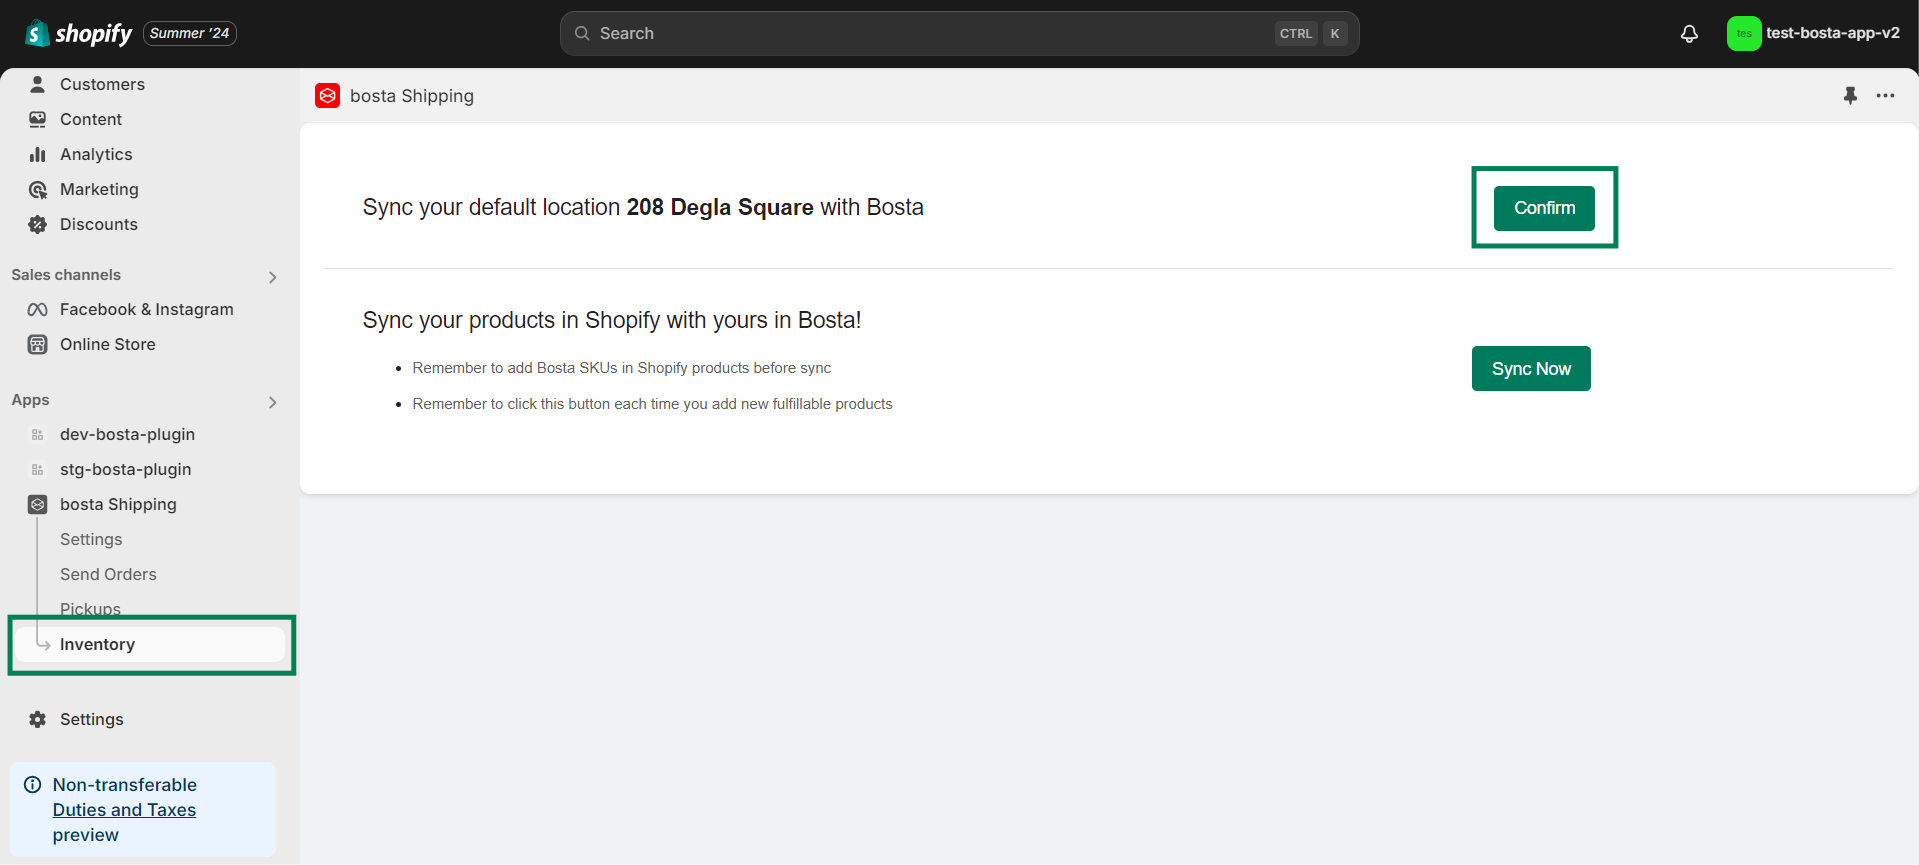
Note: Bosta can only sync inventory with your default inventory location. This is typically the first location you created or the oldest location in your Shopify store. Ensure that your default inventory location is correctly set before proceeding.
3- Sync Your Shopify Products with Bosta's
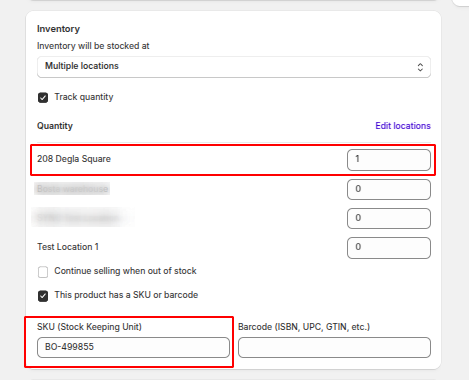
Ensure that each Shopify product has the corresponding Bosta SKU assigned.
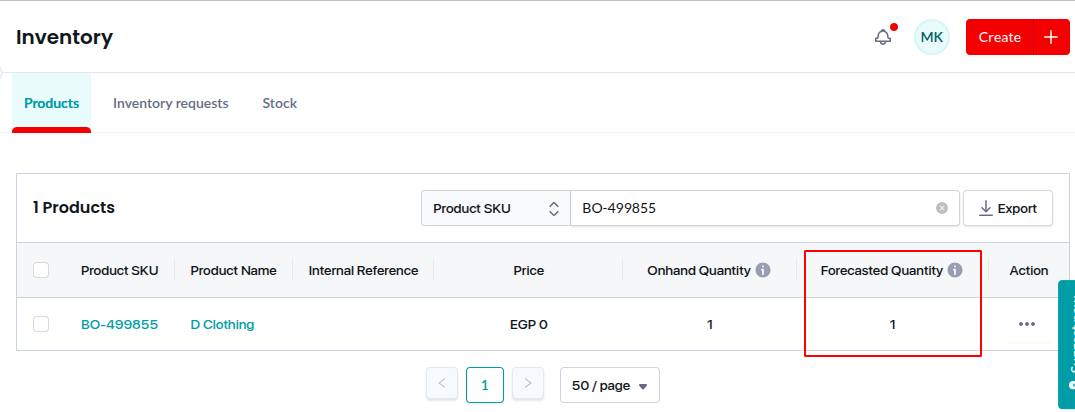
Verify that the available stock quantities in Shopify match the current available quantities in Bosta to maintain accurate inventory synchronization.
Click the first sync now button to sync your fulfillment products with Bosta.
Then click on the second sync button to sync the quantities of each fulfillable product.
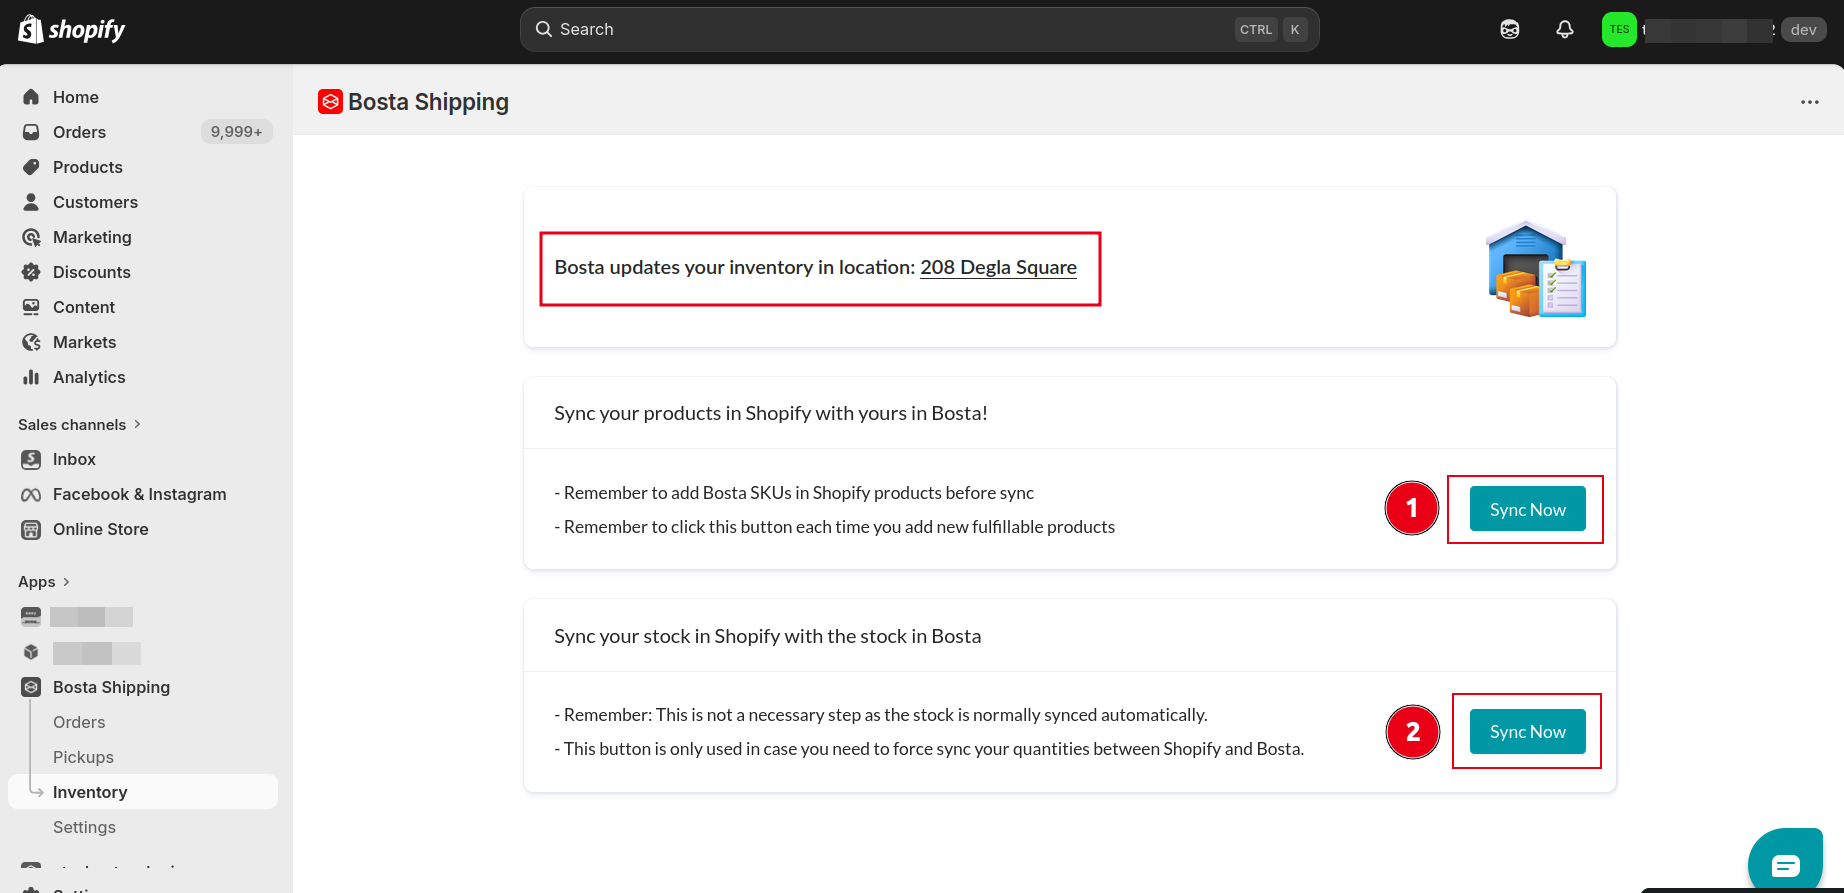
Congratulations! Your fulfillment products are now synced with Bosta.
Remember to click the sync button each time you add new products to keep your inventories aligned.
By following these steps, you can effortlessly keep your Shopify and Bosta inventories in sync, saving time and reducing the chance of manual errors.
Feel free to reach out to Bosta's fulfillment team at fulfillment@bosta.co if you encounter any issues in your inventory with Bosta
Insurance Businesses
- By default, Bosta sets the item value for your product the same as the item price once subscribed to an insurance plan.
- If that doesn't reflect your actual cost, please update it in Shopify according to the following steps, so you're charged and compensated accordingly.
Here's how to do it:
1- Navigate to the Products tab on Shopify.
2- Choose the Inventory sub-tab.
3- Click on each product and enter the actual cost (not the selling price) in the "Cost" field
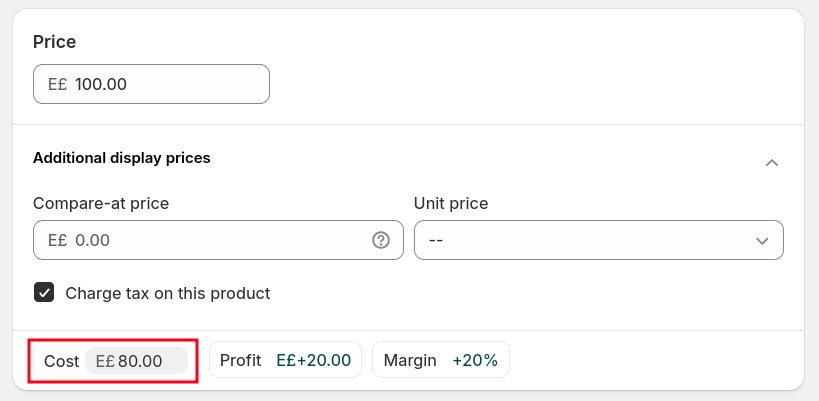
Important:
- The cost per item does not refer to the product’s selling price. Instead, it represents the actual cost of producing or acquiring the item, which is used internally for insurance and compensation purposes. However, you can choose to set the "Cost" field, the same as the "Price"